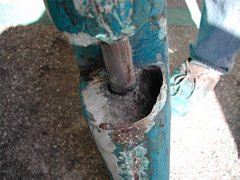
We hope deep inside the rudder everything is okay.
We drilled a few holes here and there to try to see where the water can
go. The rudder is built like the boat, with two halves seamed together.
Down the center are two sheets of plywood surrounded by a stainless
frame. The rudder is filled with all kinds of material for filler,
i.e. left over mat, glass cloth pieces and probably even floor sweepings
from the glass shop.
Two things, first the frame bends around the prop
opening making it almost impossible for the shaft to spin free in the
rudder. Second the filler material helps to keep the stainless frame
from being immersed in water. But obviously it can happen.
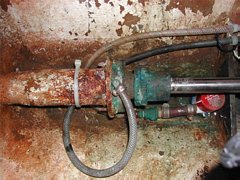
Shaft Seal Before. The area around the packing gland was certainly dirty not only from the packing drip but also from the flange holding the cutless tube. When we removed the cutless tube there was literally no caulk left around the tube and thus the drip from the flange. We made sure to pack lots of caulk around the tube and just snugged the bolts up until the caulk setup then torqued them down.

Before Picture of Inner cutless Tube. This pic shows the threads before we turned them down. Note that we already had a vent hose running from the engine vented loop which was plumbed to the flange. This hose was hooked up to the new high speed PSS to provide lubricating water to the seal and inner bearing. We plugged the hose attachment on the flange.
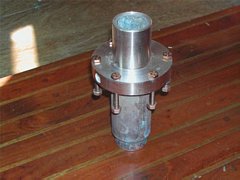
Ready for Shaft Seal Bellows. We removed the inner cutless tube and had the threads turned down for a smooth surface for the PSS seal. It was also suggested at the yard that smoothing on sealant over the threads works from their experience as does rigging tape.
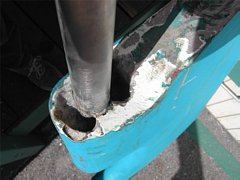
Gudgeons. The gudgeons were buried in epoxy putty and we didn't chip all the putty off. This was done so that when they went back together they would fit back into the same spot. The rudder was so well balanced before we dismantled it that we needed to make sure it went back in the same place. There were drips of water coming out of the bolt holes in the skeg for a few hours so we drilled a few holes in the skeg looking for more water. None came out but I suspect there is some moisture in there. The skeg had about 3/4" of glass at the bottom and then void. We're not sure what is inside the skeg for filler, if anything. Fiberglass is not waterproof so after 24 years moisture will get inside of the skeg. We dried it for three days and sealed it up with glass.
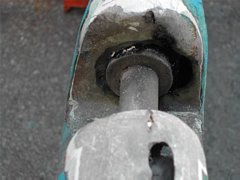
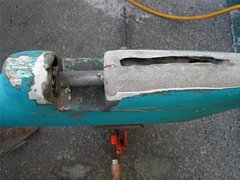
Pin Collar on Rudder. Apparently this collar takes most of the load of the lower rudder hanging on it. Water seeped out around this spot the whole time even after glassing it back up. We dug down around the pin as far as the void that was there went in. There was black colored glass in this area indicating rotted water and glass. We filled the void back up with putty and glassed over it. The glass man told us that stainless and glass are not compatible and will eventually start leaking again. We tried leaving a groove around the shaft and filling this up with caulk to seal it up.
Rudder Pin. More voids around the pin with water dripping out. We also dug out the voids along the forward seam of the rudder and filled them with putty and then glassed them over.
Rudder Shaft. Again, more voids around the shaft that were filled with a groove and sealant around the shaft.
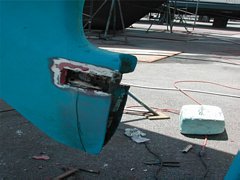
Seam Void. This is a void inside the rudder at a seam where the two halves of the rudder are glued together. It needed to be dried, filled and glassed over.
The Rudder Skeg. The gudgeons were chipped out leaving some putty still attached so that we could match them back to the same spots on the skeg. Some water came out of the bolt holes and the bolts themselves showed some signs of crevice corrosion. We replaced the bolts and epoxied the whole area back up.